|
For our final exam, we got to choose a recipe to make at home. I decided to make chocolate babka. I have never made anything of the sort before and I wanted to challenge myself with something out of my comfort zone. I got the recipe from New York Times Cooking. Before looking up this recipe, I had no idea what a babka was. After a bit of research, I learned that babka is a sweet, European braided bread. To make this recipe, the first thing I did was to convert the recipe from imperial to metric. I then divided the recipe in half to make only one loaf since the original yielded two loaves. I will insert a picture of my conversions in the pictures below. step 1: make the doughThe first step to this recipe was to mix together flour, sugar, salt, vanilla, and nutmeg. Then, add in the yeast mixture and eggs until the dough comes together. After, add half the butter and beat or pulse until the dough is smooth and elastic, then beat in the rest of the butter. Form the dough into a ball, cover the bowl, and let it rise for about an hour. I then refrigerated the dough overnight. Step 2: Make the fudge fillingTo make the fudge filling, I first combined sugar, cream and salt. I simmered it over medium heat until the sugar completely dissolved, scraped the mixture into a bowl, stirred in the chocolate, butter and vanilla until it was smooth. I then let the mixture cool to room temperature. step 3: make the streuselI stirred together flour, sugar, cocoa powder and salt. I then added in the melted butter and stirred it until it was evenly distributed before adding in the chocolate chips. step 4: make the syrupTo make the syrup, combine sugar and 80mL (1/3 cup) water in a small saucepan. Bring to a simmer over medium heat for 2 minutes, stirring until the sugar dissolves. step 5: assemblyRemove the dough from refrigerator and roll it into a 9-by-17-inch rectangle. Spread with the filling and starting with a long side, roll into a tight coil. Stick it in the freezer for 10 minutes. Then, slice one of the dough coils in half lengthwise to expose the filling. Twist the halves together and then fold the braid in half so that it fits into the pan. Place into the prepared pan, letting it curl around itself. Cover loosely with a clean kitchen towel and let rise in a warm place for 1-1.5 hours. When you're ready to bake, heat the oven to 350 degrees, clump the streusel together and sprinkle it all over the top of the bread. Bake it for 40 to 50 minutes. step 6: pour on the syrup and enjoy!After you take it out of the oven, use a skewer or paring knife to pierce the bread all over before pouring the syrup on top of the bread. Let the bread cool and then enjoy! My brother didn't really like it but my mom and I thought it was delicious! The rich, buttery flavour of the bread went really well with the dark chocolate filling. My reflection of this yearI really enjoyed this class this entire year. I have learned so much both in class and online that has changed the difficulty level, quality, and variety of things I bake. I learned many different techniques such as the creaming method, the biscuit method, and the muffin method. I also had the change to make many different things that I would have never had the courage to try by myself at home (such as pies, breadsticks, and scones). I really liked being about to work with a partner and how we were able learn from our mistakes rather than being penalized for them. I also loved how were given opportunities both in class and online to try what we wanted. For example, in the health unit, we got to pick any healthy recipe online to bake, where we chose to make healthy chocolate cupcakes. We also got to experiment and show our creativity with putting different add-ins on our pizza and in our chocolate chip cookies. At home, we were also allowed to make whatever we wanted for our final exam. Through learning at home, I also learned how to make do with the ingredients you had at home. I was able to make sourdough and banana bread with what I had in my house without having to go grocery shopping.
For my final exam, I really wanted to challenge myself. I felt that I was well equipped with the skills and techniques I have learned throughout the year and I wanted to put them to the test. I chose a complex recipe, baked something that I was unfamiliar with, used the skills that I have practiced throughout the year, and made something I was proud of that I would never have expected myself to be able to make.
0 Comments
Ladies and gentlemen, I present to you, the second episode of my baking show, "Fake It Til You Bake It." In this episode, we make lemon meringue pie. This was probably one of the most difficult recipes I've made since it has three components: the pie crust, the lemon curd, and the meringue. We also forgot that we had to "cook" the egg whites before whipping them, so we had to stop beating it, heat it, then continue beating it again. Thankfully, it turned out fine. The pie turned out to be delicious! It had the perfect balance of butteriness from the crust, tanginess from the lemon curd, and sweetness from the meringue.
I've actually never eaten a poptart before, probably because my mom was super healthy when I was little so she wouldn't feed us anything that wasn't a whole food. I've always wondered what poptarts tasted like since they always seemed like such an iconic breakfast food, so I decided to make my own! I got the recipe from Saving Room for Dessert. For the crust, I made a pie crust and for the filling, I made a homemade strawberry jam. They were delicious!
With so much time in quarantine, I decided to start my own cooking show for fun! It's called "Fake it til you Bake it." In the first episode, I made lemon loaf! The recipe is from She Loves Biscotti. For some reason, it reminded me of Uncle Tetsu's. I think it might be because the recipe didn't call for lemon extract. Anyways, here is the video, I hope you find it entertaining, and enjoy!
I decided to make banana bread because we had three super ripe bananas just sitting around in my house. I decided to use a healthier banana bread recipe as we are all mostly stuck at home and not exercising as much as normal. I reduced the amount of sugar because my bananas were extremely ripe and I didn't want my banana bread to be too sweet. I also substituted coconut oil for the butter. It turned out to be delicious! For our next assignment, we had to make sourdough bread with our sourdough starter. We had to use a recipe from King Arthur Flour, which has a ton of recipes you can make using your sourdough starter. This was my first time ever making sourdough bread (or bread, for that matter) and I can tell you that it was definitely a journey! After my starter was ready, I put it in the fridge because I didn't want to use it yet. When I finally decided to use it, I took it out of the fridge and left it on the counter again. It didn't look the most bubbly, but I just hoped for the best and tried to make bread out of it. I'm not sure whether it was the starter, the fact that I didn't let the bread rise for long enough, or that I didn't use enough flour (probably all the above), but the dough sort of just spread out instead of rising and ended up turning into this hard, dense, rock-like bread as you can see in the pictures below However, I was determined to make something that was at least edible, so I decided to make a whole new starter as I assumed that my old starter was dead. During this time, I still left my old starter on the counter and fed it, hoping that it would resurrect. When it was the fifth day of feeding my new starter, I was confused because it still hadn't really increased in volume like the recipe said it would. However, my older starter which was sitting on the counter behind my new starter had increased in volume and was spilling out of the jar! I was extremely confused but I decided to try using my old starter again. I followed the same recipe but this time, I let my dough rise for a lot longer. This time, I could tell that the dough did rise and although it still spread out more than I like, the bread actually tasted like sourdough! Some things that I learned from this assignment are that not all starters will act same. It really depends on its environment. Sometimes, you have to wait for more than the predicted time for your starter to be ready and for your dough to rise. I also learned that I need to add more flour to my dough next time to prevent it from spreading as much. Overall, I think I learned a lot from this assignment and I'm glad I tried making it more than once.
Since we are all stuck at home with a limited inventory, my teacher decided to get my class to make sourdough. All you need is flour and water. Using a glass jar, I put 2/3 cup of flour and 1/3 cup of water. I then mixed it together, covered the jar with a cloth, and let it sit. For the next few days, I will continue adding the same amount of flour and water every 12-24 hours. I am actually very excited to be making this because I have always been curious as to how sourdough bread was made. Now, I can make my very own! This is what it is looking like on day one. 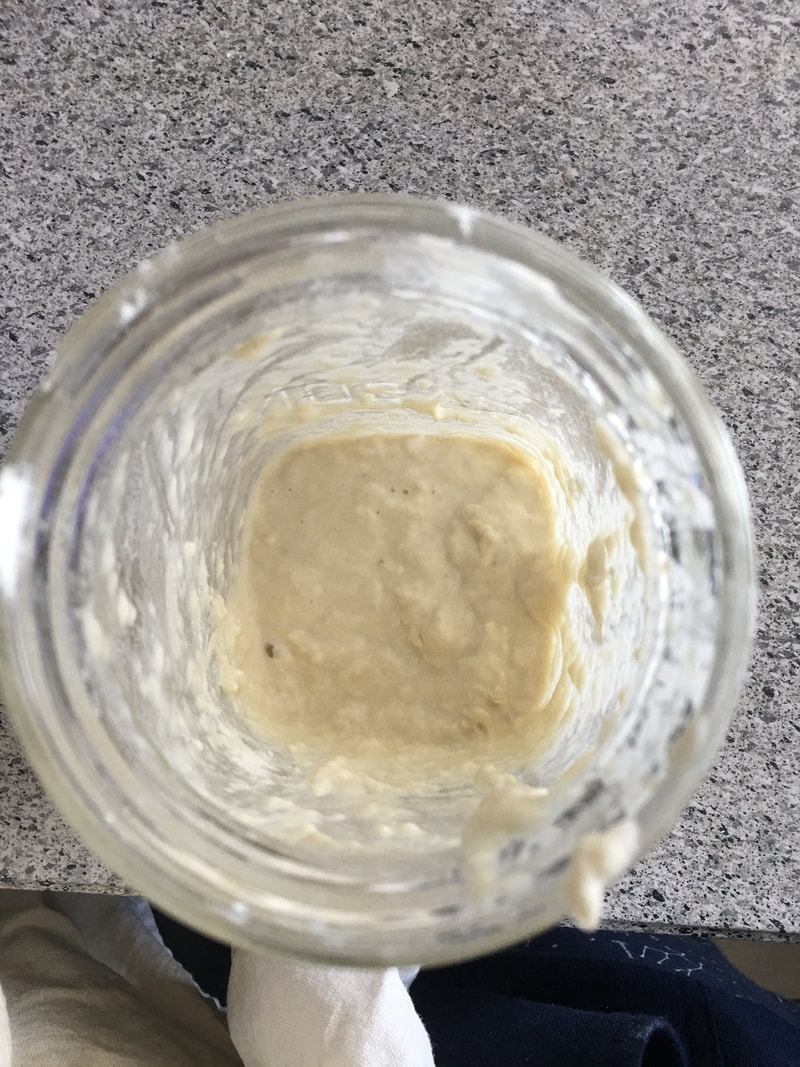 After six days of feeding my sourdough starter everyday, this is what it looks like! I wish I had gotten a side profile of the starter on the first day so that it would be easier to compare. I will be sure to remember next time! Anyway, the starter has definitely increased in volume. As you can see in the pictures, there are also tiny bubbles in the dough. It smells pretty sour and it is currently sitting in my fridge right now. I can't wait to make sourdough bread out of it! Raisin bran muffins are my dad's all time favourite muffins (I'm pretty sure it's a dad thing). He normally gets them from Tim Hortons, but I decided to try making some for him since I have so much extra time. This was also the first time I ever baked with bran. The difference it made was that I had to mix in the bran with the wet ingredients and let it sit for five minutes before combining the wet ingredients with the dry ingredients. Besides that, it was made just like any other muffin. Using the muffin method, I mixed the wet ingredients with the bran and the rest of the dry ingredients separately, and then combined them with a fork. I then added in the raisins, baked it for 20 minutes, and gave them to my dad to try. So far, these muffins have been his favourite thing I have made so far. For the past few weeks, I have been doing pretty well! It has been a very restful four weeks and it is nice to have a break from all my normal activities. However, I do miss hanging out with my friends, going to swim practice, and being able to go outside. Since I can't go to school, my teachers have been giving me assignments using Microsoft Teams. I actually prefer this way of learning because I can learn and work at my own pace. I also don't have to wake up early everyday. With all the extra time I have, I have mostly been playing board games, exercising, eating, sleeping, and baking. I also decided to start my own cooking show for fun and I will post the edited videos a little later. I decided to make pizza! With both my parents working, I have been making lunch for both my brother and I. Since I have so much extra time in my hands, I decided to try making pizza again! This time, I used the recipe from JoCooks. First, I combined water, sugar and yeast together waited for the mixture to start frothing up. Then, I added flour and salt, olive oil and the yeast mixture into the mixing bowl of my stand mixer. I mixed everything together using the dough hook for about 5 minutes, shaped the dough into a ball, placed it in an oiled bowl, rubbed oil on the dough as well, covered it, and let it rest. When it was ready to bake, I topped it off with some marinara sauce and cheese. I thought it was delicious! I think next time, I will try to make the crust thinner because the bread to topping ratio was slightly off. |
Photo used under Creative Commons from La Marquise de Jade
